http://simplylightwave.com/lightwave-tutorial/t576/
http://simplylightwave.com/lightwave-tutorial/t577/
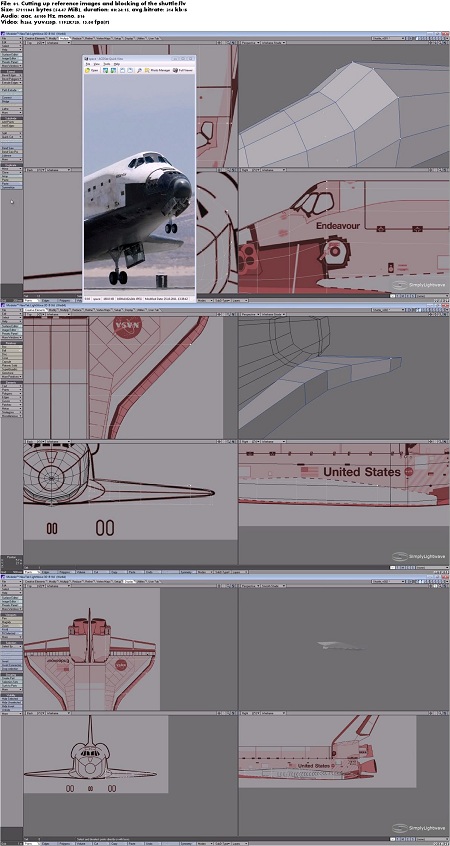
Welcome to a new tutorial from SimplyLightwave. This time we bring you the making of the Space Shuttle Discovery, as NASA has decided to retire their shuttle program we thought we'd have a go at making our own.
Unfortunately we didn't quite have the budget to recreate it in the garden, so we gave this to Milivoj Popovic and asked him to do it in Lightwave. Begin creating stunning photorealistic models with over 8 hours of project-based training in this new tutorial series from SimplyLightwave. Follow along with Milivoj, lead modeler at
Lemonade3d, in this comprehensive project where you will learn the complete workflow to create a realistic high-polygon space shuttle in Lightwave. After completing this project, you'll have a much better understanding of the entire process to make a realistic and believable vehicle in Lightwave. Perfect for intermediate users.
This tutorial was created in Lightwave 9.6 and is also suitable for users of Lightwave 10 and 11.
Part 2 in this series covering texturing and scene assembly will be released next month. Happy Easter!
Learn to paint textures for hard surface models to a high standard, as well as set up lighting and materials to get a photorealistic render of the space shuttle
Discovery. Through 20 hours of tuition, this project-based course will teach you all the texturing and lighting techniques you'll need to know to create your own top-
notch renders. We also covers post-production of images and creating seamless environment composites in Photoshop
Volume 1 : Information
Lesson 1: Cutting up reference images and blocking of the shuttle
Lesson 2: Blocking out the tail and connecting wing with fuselage
Lesson 3: Connecting fuselage with the tail and main shuttle body
Lesson 4: Modeling the parts of the back of the shuttle
Lesson 5: Cutting out holes and continuing to add detail to the back
Lesson 6: Creating ring structures and pipes
Lesson 7: Connecting surfaces at the back of the shuttle
Lesson 8: Creating the windows at the front and adjusting topology
Lesson 9: Continuing to add detail to the windows and trim
Lesson 10: Sharpening up edges and aligning window trim with body
Lesson 11: Aligning various surfaces of the body
Lesson 12: Modeling hinges and wires for landing gear cover
Lesson 13: Creating the wheels and other parts for the landing gear
Lesson 14: Realigning surfaces for mirroring
Lesson 15: Making adjustments to the nose cover at the front
Lesson 16: Freezing geometry and final tweaks
Volume 2: Information
Lesson 1: UV mapping begins
Lesson 2: UV mapping continues
Lesson 3: Adding details to the geometry for more realism
Lesson 4: Making adjustments to the model for landing pose
Lesson 5: Test rendering reflection maps and making window glass
Lesson 6: Creating the wing tile texture
Lesson 7: Making the termal tile texture for the bottom of the body
Lesson 8: Adding detail to the tile textures
Lesson 9: Surfacing and adding procedural noise textures to tiles
Lesson 10: Painting in detail on the wing color map in Photoshop
Lesson 11: Adding more detail and irregularity to the wing texture
Lesson 12: Texturing the area where the wing and belly meet
Lesson 13: Adding text and logo to the wing and painting dirt
Lesson 14: Texture painting of dirt and discoloration on metal
Lesson 15: Creating a color map for the cockpit and upper body
Lesson 16: Continuing to create textures for the upper body
Lesson 17: Painting in panel lines for the tiles of the upper body
Lesson 18: Painting of panel lines continues
Lesson 19: Finalizing panel lines and breaking up symmetry
Lesson 20: Texturing the bottom of the wing
Lesson 21: Texturing the nose
Lesson 22: Continuing to add detail to the nose textures
Lesson 23: Painting the texture maps for the tip of the nose
Lesson 24: Texturing the wing flaps
Lesson 25: Connecting lines where different texture maps meet
Lesson 26: Texturing of tail, wheels and shuttle exhaust
Lesson 27: Continuing to texture shuttle exhaust and back area
Lesson 28: Adding dirt to the sides of the shuttle
Lesson 29: Creating the bump maps for the shuttle body
Lesson 30: Finishing touches to the shuttle side maps
Lesson 31: Tweaking maps and assigning them to the model
Lesson 32: Painting the environment composite with landing strip
Lesson 33: Scene set up with grass and landing strip in Layout
Lesson 34: Adding weight maps and test rendering shuttle materials
Lesson 35: Tweaking lights and materials in Layout
Lesson 36: Creating materials for landing gear and windows
Lesson 37: Continuing to tweak textures and materials
Lesson 38: Adding smoke trails with particles and compositing them
Lesson 39: Color correction and finalizing composite in Photoshop


/https%3A%2F%2Fprofilepics.canalblog.com%2Fprofilepics%2F8%2F0%2F803567.jpg)


/https%3A%2F%2Fstorage.canalblog.com%2F02%2F71%2F918283%2F118622595_o.jpg)
/https%3A%2F%2Fstorage.canalblog.com%2F10%2F34%2F918283%2F114352567_o.gif)
/https%3A%2F%2Fstorage.canalblog.com%2F05%2F55%2F918283%2F114201278_o.jpg)